RTSDK
Javascript RTSDK - Topia Client Library
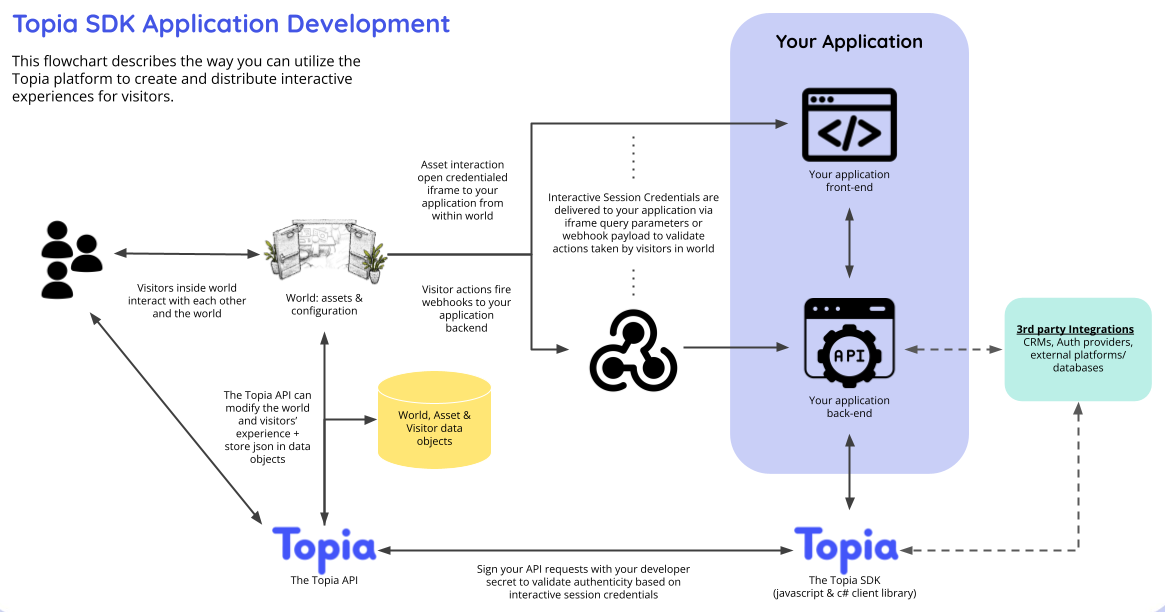
Create integrated, interactive experiences with Topia’s SDK and API
Topia offers a robust SDK and API that allows anyone to build custom apps or integrate any 3rd-party content, application, game or learning experience. Dedicated deployments launch with dozens of SDK Applications, including mini-games and social apps made by the Topia team and our developer community
Topia’s SDK/API can be used to:
- Turn existing applications and systems into multiplayer, cooperative experiences
- Integrate existing content into multiplayer learning journeys
- Create your own custom, dynamic social experiences and games
- Store and persist JSON data objects across sessions
- Add Social Connectivity Networking capabilities to your existing platforms
Key Features:
- Built-in safety and security via an interactive credentialing system
- Control over the code and IP of your creations
- Integrated via i-frame, in-world assets, and server-based bi-directional data flow
- Every object, world, and visitor has a JSON database you use to build interactivity and data persistence
- Powerful SDK classes and methods enable control of every aspect of Topia
Resources:
Need inspiration?! Check out the following applications which utilizes the SDK to create new and enhanced features inside topia.io:
- Bulletin Board: A message board style application where users can submit messages and/or images for approval and an admin can approve the message so that it can be added to the world.
- Jukebox: A real-time interactive music player.
- TicTacToe: A turn based multiplayer game built completely on the canvas.
- Quest: A dynamic hide and seek game where an admin can drop multiple quest items within a world for users to find.
Questions, comments, or have something exciting to share with the Topia team? Reach out to apps@topia.io!
Authorization
Visitors of a topia.io world interact with each other and the interactively configured assets in your world without the need for an API Key. This is all made possible through Interactive Session credentials passed to the SDK with every request, when applicable. What does this mean for you? Not much, actually! All of the magic happens behind the scenes and all you have to do is make sure that new class constructors include an options object like this: options: WorldOptionalInterface = { attributes: {}, credentials: {} } and all calls to this.topia.axios include the inherited this.requestOptions parameter.
Want to build interactive assets? This is how you can get started:
Getting a Key Pair:
- Navigate directly to your integrations page or follow the steps below from within a world.
- Click on your image (or circle) at the top left of the left hand navbar.
- Click Edit Profile. This will bring you to a separate dashboard.
- Click Integrations on the left nav
- Click the “Add Key Pair” button. This is going to be your public / private key pair for your app.
Adding a Key Pair to an asset:
Make an asset “interactive” by adding your PUBLIC key to the integrations page of the asset editor.
- Go back to your world. Make sure you are in “Edit Mode” by toggling on Edit on the left nav bar
- Hover over any asset. Click the pencil icon that should show up on hover and select “Edit”
- Go to the Integrations tab
- At the bottom, you'll see a section that says “Add player session credentials to asset interactions”. Toggle that on. Now webhooks that fire from this asset and iframes that open from this asset will include the following values:
- assetId
- interactivePublicKey
- interactiveNonce
- visitorId
- urlSlug
- The above values are included in the query params of the iframe URL as well as payload of the webhook.
- Once you have the above values you can pass them as credentials into the factory classes when creating class instances.
// Set up the SDK a separate util file
import dotenv from "dotenv";
dotenv.config({ path: "../.env" });
import { Topia, AssetFactory, DroppedAssetFactory, UserFactory, VisitorFactory, WorldFactory } from "@rtsdk/topia";
const config = {
apiDomain: process.env.INSTANCE_DOMAIN || "api.topia.io",
apiProtocol: process.env.INSTANCE_PROTOCOL || "https",
interactiveKey: process.env.INTERACTIVE_KEY,
interactiveSecret: process.env.INTERACTIVE_SECRET,
};
const myTopiaInstance = new Topia(config);
const Asset = new AssetFactory(myTopiaInstance);
const DroppedAsset = new DroppedAssetFactory(myTopiaInstance);
const User = new UserFactory(myTopiaInstance);
const Visitor = new VisitorFactory(myTopiaInstance);
const World = new WorldFactory(myTopiaInstance);
export { Asset, DroppedAsset, User, Visitor, World };
// Use the SDK in your controllers
import { Request, Response } from "express";
import { World } from "../utils/index.js";
export const handleFireToast = async (req: Request, res: Response) => {
try {
const { assetId, interactiveNonce, interactivePublicKey, urlSlug, visitorId } = req.query;
const { title, text } = req.body;
const world = World.create(urlSlug, {
credentials: { assetId, interactiveNonce, interactivePublicKey, urlSlug, visitorId },
});
await world.fireToast({
title,
text,
});
return res.json({ world, success: true });
} catch (error) {
return res.status(error.status || 500).send({ error, message, success: false });
}
};
Want to enable want world owners / admins to use the app outside of Topia, but still have ability to modify things in worlds where they have the permission to do so? This is how you can create an API Key:
A Topia provided API Key can be included with every object initialization as a parameter named apiKey. This API Key is used to in authorization headers in all calls to the Public API. Use it wisely and sparingly! The API Key should only be used to authorize your app (and therefore all of it's users) to perform specific actions when not currently in a Topia world. In most case the ability to interact with an SDK application should be controlled per user using Interactive Credentials (see above).
- Navigate directly to your integrations page or follow the steps below from within a world.
- Click on your image (or circle) at the top left of the left hand navbar.
- Click Edit Profile. This will bring you to a separate dashboard.
- Click Integrations on the left nav.
- Click Generate New API Key and copy the API Key to be used in your .env file.
New for June 2025: Multiplayer Experience Engine
Topia has developed a powerful new Experience Engine that enables extremely low-latency, interactive in-canvas multiplayer experiences. This engine is purpose-built for real-time interaction and supports a wide range of dynamic behaviors, making it ideal for collaborative activities, games, and social experiences within Topia worlds.
Key Features
- Ultra Low Latency: Real-time feedback for seamless multi-user interaction and state synchronization.
- Physics & Collision: Includes a robust physics and collision system to support realistic and responsive behaviors.
- Real-Time Interactivity: Supports dynamic responses to user input and environmental changes inside the canvas.
- Optimized for the Web: Engineered to perform smoothly across browser-based environments with minimal resource impact.
SDK Integration: Leverage the SDK inside the Experience Engine to:
- Trigger visual/audio effects based on real-time interactions
- Save and persist spatial data, such as object positions or interaction states
This engine unlocks a whole new layer of interactivity, paving the way for creative, immersive experiences including educational tools, multiplayer games, or collaborative activities.
Get In Touch
To sign up for the experience engine private beta, visit https://topia.io/p/game-engine.
Developers
Get Started
Boilerplates
We have two boilerplates available to help you get started. Pick the one that best suits your needs, clone it, and let the coding begin!
Run yarn add @rtsdk/topia or npm install @rtsdk/topia
Create your instance of Topia and instantiate the factories you need:
dotenv.config();
import dotenv from "dotenv";
import { AssetFactory, Topia, DroppedAssetFactory, UserFactory, VisitorFactory, WorldFactory } from "@rtsdk/topia";
const config = {
apiDomain: process.env.INSTANCE_DOMAIN || "https://api.topia.io/",
interactiveKey: process.env.INTERACTIVE_KEY,
interactiveSecret: process.env.INTERACTIVE_SECRET,
};
const myTopiaInstance = new Topia(config);
const Asset = new AssetFactory(myTopiaInstance);
const DroppedAsset = new DroppedAssetFactory(myTopiaInstance);
const User = new UserFactory(myTopiaInstance);
const Visitor = new VisitorFactory(myTopiaInstance);
const World = new WorldFactory(myTopiaInstance);
export { Asset, DroppedAsset, User, Visitor, World };
Put it to use in your controller:
import { Request, Response } from "express";
import { DroppedAsset } from "utils/topiaInit.ts";
import { VisitorInterface } from "@rtsdk/topia";
export const getDroppedAssetAndVisitor = async (req: Request, res: Response) => {
try {
const { assetId, interactiveNonce, interactivePublicKey, urlSlug, visitorId } = req.query;
const credentials = {
interactiveNonce,
interactivePublicKey,
assetId,
urlSlug,
visitorId,
};
const droppedAsset = await DroppedAsset.get(assetId, urlSlug, { credentials });
await droppedAsset.fetchDataObject();
const visitor: VisitorInterface = await Visitor.get(visitorId, urlSlug, { credentials });
return { droppedAsset, isAdmin: visitor.isAdmin };
} catch (error) {
return res.status(error.status || 500).send({ error, success: false });
}
};
Data Objects
Data Objects can be used to store information such as game state, configurations, themes, and analytics. There are three types of Data Objects:
World:
The data object attached to the world will store information for every instance of the app in a given world by keyAssetId or sceneDropId and will persist even if a specific instance is removed from world. Data stored in the World data object should be minimal to avoid running into limits.
Example - Update two specific data points:
await world.updateDataObject({
[sceneDropId]: { keyAssetId: droppedAsset.id, themeId: "custom", totalInteractions: 1 },
});
Example - Increment a specific value within the data object by 1:
await world.incrementDataObjectValue([`${sceneDropId}.totalInteractions`], 1);
Dropped Asset:
The Dropped Asset data object should only store what is unique to the specific instance of the app in the world such as game state. If the Dropped Asset is deleted, the data object would be lost as well so be sure to only store information here the doesn't need to persist!
Example - Initialize data object with default data and keyAssetId:
await droppedAsset.setDataObject(
{
...defaultGameData,
keyAssetId: droppedAsset.id,
},
{ lock: { lockId, releaseLock: true } },
);
Example - Update lastInteraction date and playerCount:
await droppedAsset.updateDataObject({ lastInteraction: new Date(), playerCount: playerCount + 1 });
User:
The data object attached to the visitor should store information related specifically to the visitor i.e. progress. For tracking across multiple world/instances use ${urlSlug}_${sceneDropId} as a unique key.
Example - Initialize data object with default data and keyAssetId:
await visitor.setDataObject(
{
[`${urlSlug}_${sceneDropId}`]: {
currentStreak: 0,
lastCollectedDate: null,
longestStreak: 0,
totalCollected: 0,
},
},
{ lock: { lockId, releaseLock: true } },
);
Data Object Locking
All of our data object set, update, and increment methods have an optional lock argument. You can create a lock id using that parameters specific to the action you are taking plus a timestamp so that the lock will expire after a certain amount of time has passed. As an example, TicTacToe allows users to Reset the game board so that they can start a new game but we'd only want the reset to happen once even if the user(s) press the button multiple times. To prevent multiple resets from happening within a 10 second window (stopping the calls from going through and preventing the race condition), we'd lock the object by doing the following:
try {
await droppedAsset.updateDataObject(
{ isResetInProgress: true },
{
lock: { lockId: `${assetId}-${resetCount}-${new Date(Math.round(new Date().getTime() / 10000) * 10000)}` },
},
);
} catch (error) {
return res.status(409).json({ message: "Reset already in progress." });
}
Using the code above would also allow us to check if isResetInProgress === true and prevent the code from progress immediately. Make sure that when using a lock such as this that you also call await droppedAsset.updateDataObject({ isResetInProgress: false })}; after all reset functionality has been executed.
Turn based locking Locking data object updates can also be extremely helpful when building a turn based game. As an example, TicTacToe should only allow one user to take a turn at a time. To prevent multiple moves at once we could use the following:
try {
const timestamp = new Date(Math.round(new Date().getTime() / 5000) * 5000);
const lockId = `${keyAssetId}-${resetCount}-${turnCount}-${timestamp}`;
await droppedAsset.updateDataObject({}, { lock: { lockId, releaseLock: false } });
} catch (error) {
return res.status(409).json({ message: "Move already in progress." });
}
Once complete be sure to also call await keyAsset.updateDataObject({ turnCount: turnCount + 1 }); so that the next player is free to take their turn!
Custom Analytics
You can leverage the data object methods for all types to track analytics unique to your Public Key by passing analytics as an optional array along with profileId, urlSlug, and/or uniqueKey to all calls that set, update, or increment data objects!
Examples leveraging World data objects calls:
await world.setDataObject({ hello: "world" }, { analytics: [{ analyticName: "resets"} ], lock: { lockId, releaseLock: true });
await world.updateDataObject({}, { analytics: [ {analyticName: "matches", uniqueKey: `${playerOneProfileId}-${playerTwoProfileId}`, urlSlug }], });
await world.incrementDataObjectValue(`${sceneDropId}.completions`, 1, { analytics: [{ analyticName:"completions", incrementBy: 2, profileId, uniqueKey: profileId, urlSlug }] });
Examples leveraging Visitor data objects calls:
await visitor.setDataObject(
{ hello: "world" },
{ analytics: [{ analyticName: "starts" }], lock: { lockId, releaseLock: true } },
);
await visitor.updateDataObject(
{},
{ analytics: [{ analyticName: "emotesUnlocked", profileId, uniqueKey: profileId }] },
);
await visitor.incrementDataObjectValue(`completions`, 1, {
analytics: [{ analyticName: "completions", incrementBy: 2, profileId, urlSlug, uniqueKey: profileId }],
});
Note: passing an empty object does NOT impact the data objects themselves but rather allows you to track custom analytics across all instances of your application with a given Public Key.
Contributors
Get Started
Run gh repo clone metaversecloud-com/mc-sdk-js
Issues
We've added an Issue template to help standardize Issues and ensure they have enough detail for a developer to start work and help prevent contributors from forgetting to add an important piece of information.
Pull Requests
We've added a Pull Request template to help make it easier for developers to clarify what the proposed changes will do. This helps facilitate clear communication between all contributors of the SDK and ensures that we are all on the same page!
Documentation
Styles
The SDK Stylesheet is already added to every boilerplate. To view documentation and examples please click here.
AI Rules for @rtsdk/topia
Always follow the rules outlined in ./ai/rules.md.
Developer Documentation
We use TypeDoc to convert comments in TypeScript source code into rendered HTML documentation. Comments should be simple and concise and include examples where applicable. Please be sure to add or update comments accordingly!
To update docs run yarn docs.
To view docs locally open mc-sdk-js/clients/client-topia/docs/modules.html in your browser.
Example of Class comments:
/**
* Create an instance of Dropped Asset class with a given dropped asset id, url slug, and optional attributes and session credentials.
*
* @example
* ```ts
* import { DroppedAsset } from "utils/topiaInit.ts";
*
* const droppedAsset = await DroppedAsset.get(exampleDroppedAssetId, exampleUrlSlug, {
* credentials: { interactivePublicKey: "examplePublicKey", interactiveNonce: "exampleNonce", assetId: "exampleDroppedAssetId", visitorId: 1, urlSlug: "exampleUrlSlug" }
* });
* ```
*/
Example of method comments
/**
* Sets the data object for a dropped asset and assigns the response data to the instance.
*
* @remarks
* Optionally, a lock can be provided with this request to ensure only one update happens at a time between all updates that share the same lock id
*
* @category Data Objects
*
* @example
* ```ts
* await droppedAsset.setDataObject(
* { resetCount: 0 },
* {
* analytics: [{ analyticName: "resets"} ],
* lock: { lockId: `${droppedAssetId}-${resetCount}-${new Date(Math.round(new Date().getTime() / 10000) * 10000)}` },
* },
* );
*
* const { resetCount } = droppedAsset.dataObject;
* ```
*/
Testing
We use Jest for testing and take advantage of dependency injection to pass mock data into our services.
To run the test suite, please run yarn test.